
This guide explains how to design your gear for production with Custom Fightwear. You will learn about the basic principles and common mistakes, and we will share tips and recommendations to help you have the best possible results.
Before You Start
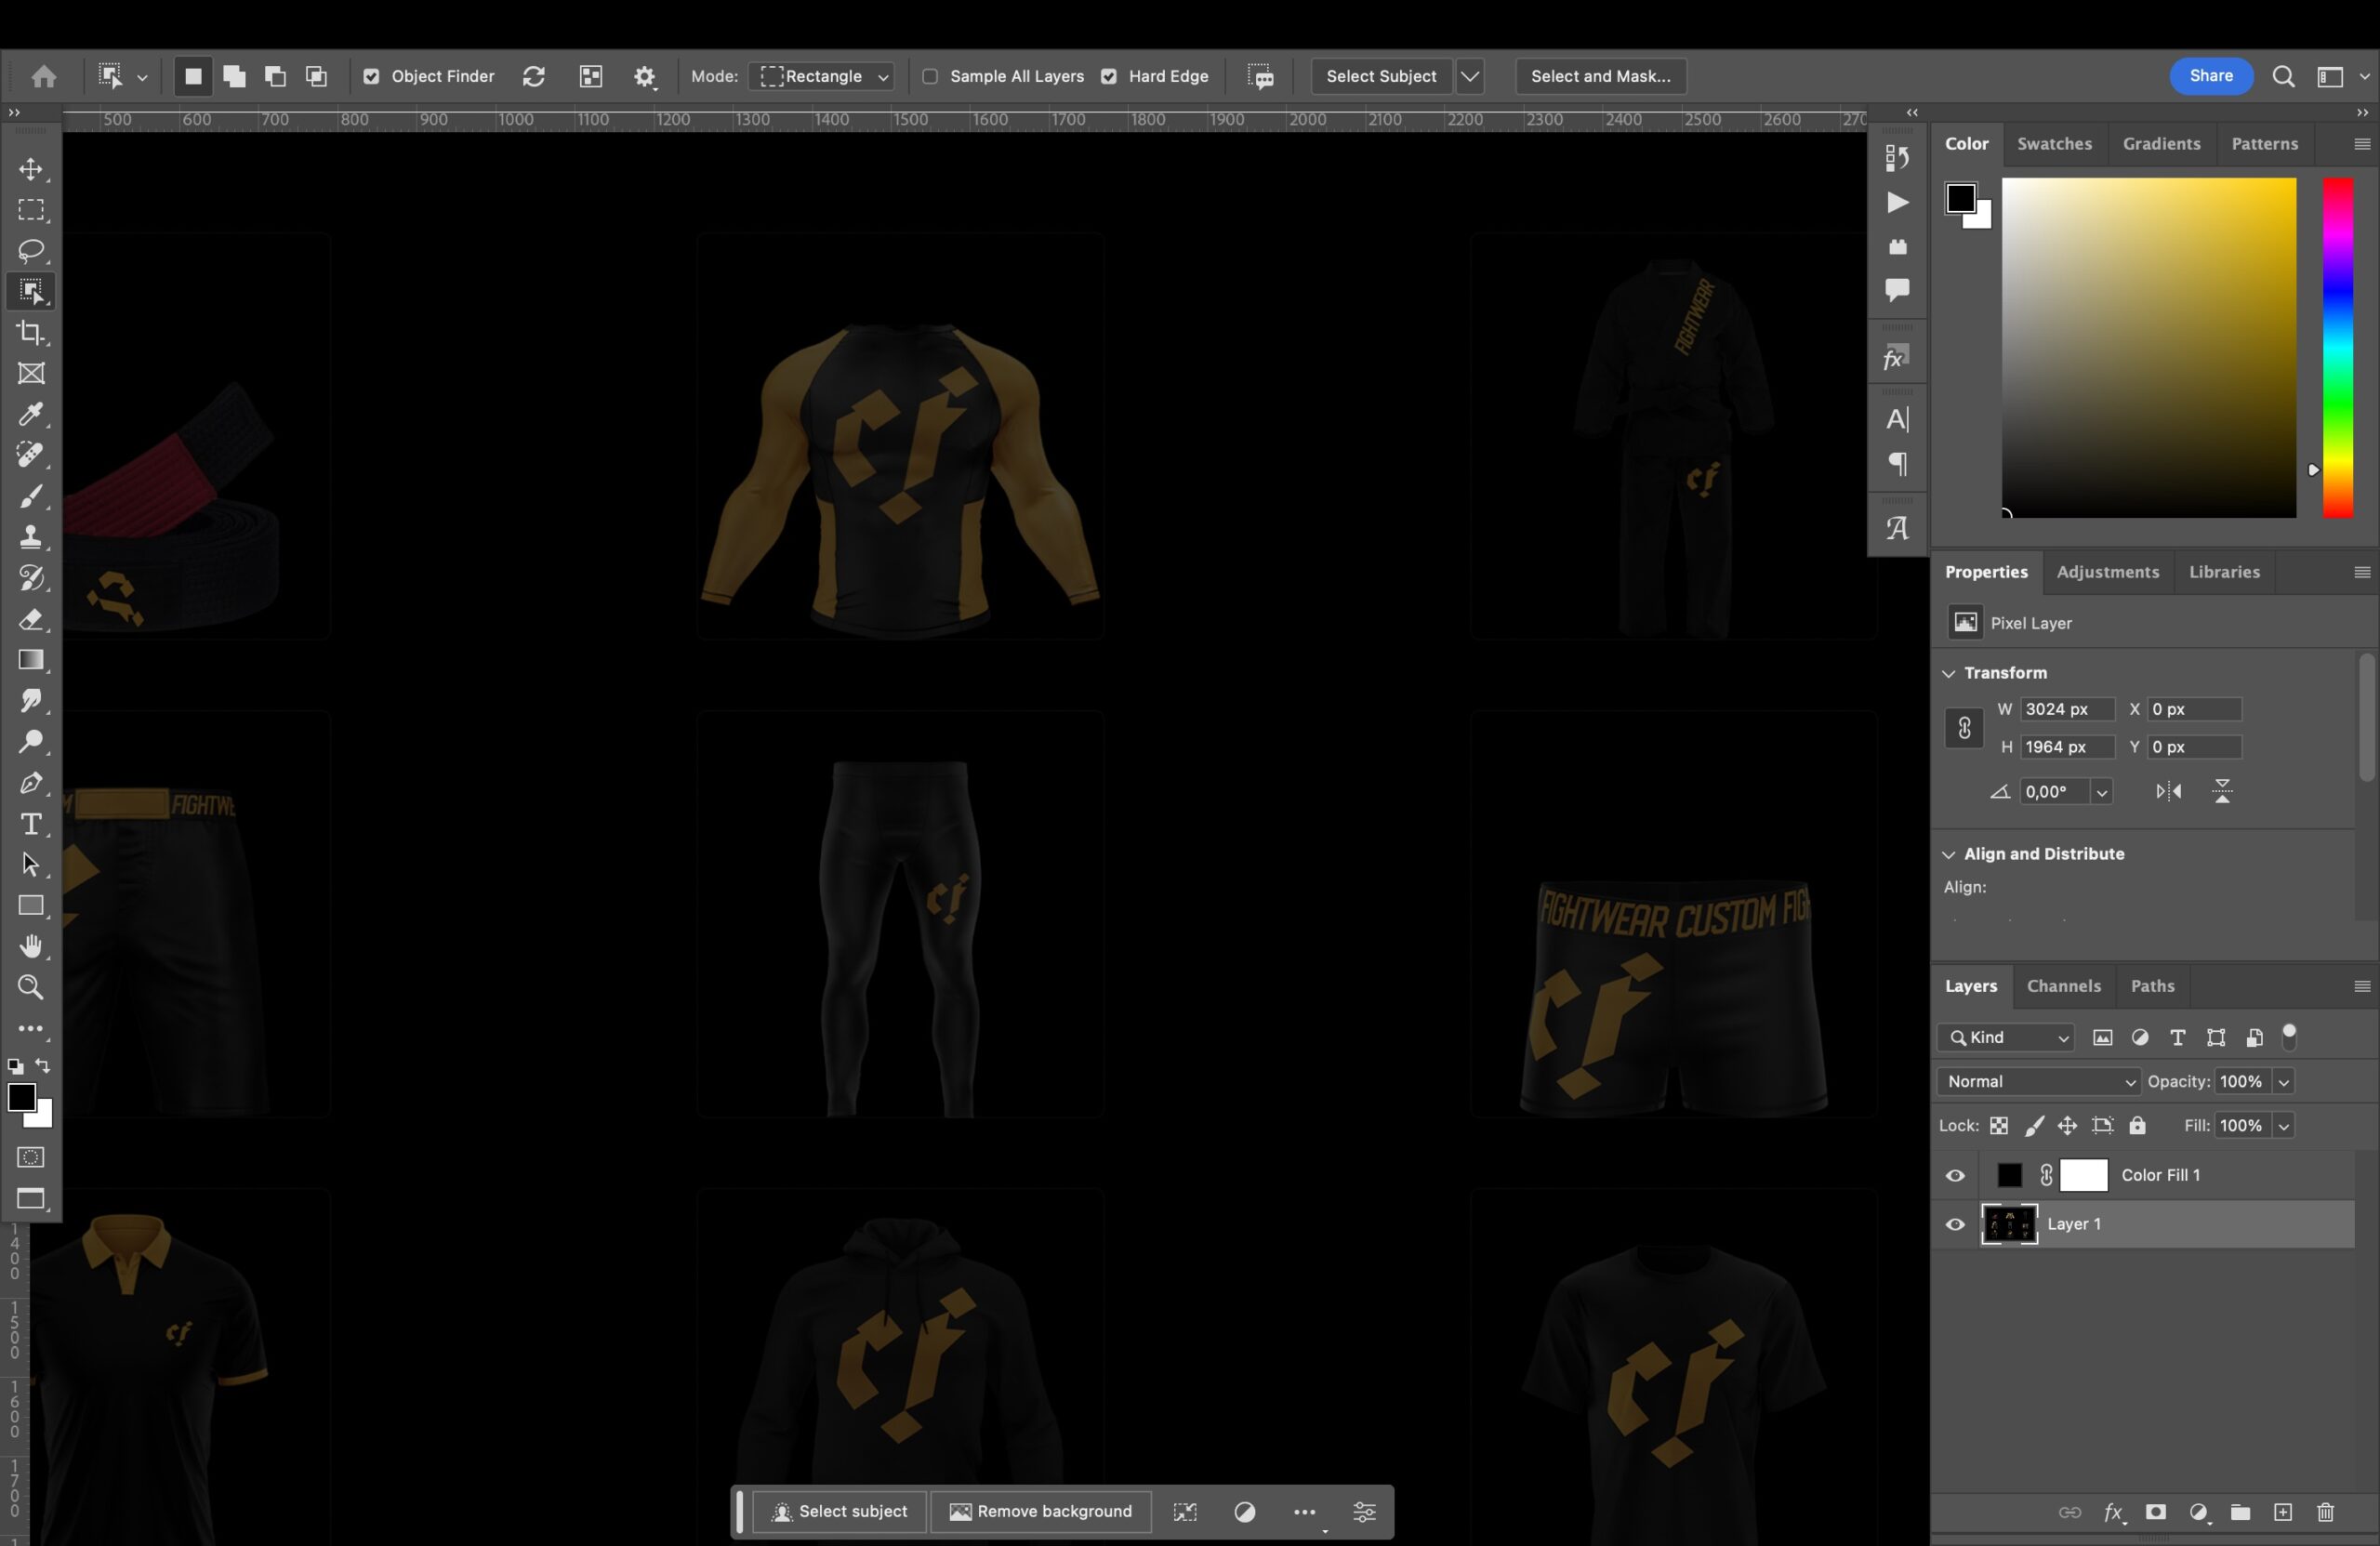
At Custom Fightwear, we offer three options for designing your fight wear. If you have no design experience, we recommend you choose “Simple Design” or “Design it for me.”
If you have some experience, you can take complete control over the look of your gear with the “Do It Yourself” option and make the most out of the custom part of Custom Fightwear.
Let’s get right into it.
What you’ll need?
Although smartphones can do a lot these days, most likely, you will need a laptop or a computer for this.
There are suitable graphic editors, whether you are using a PC, Mac or Linux. Adobe has been an industry standard for many years, so if you can, we recommend using their apps. There are free alternatives as well. We will recommend some of the most popular ones shortly.
The part where most people get stuck in production templates. These are the shapes of pieces of fabric that are later printed, assembled and sewed together in the factory. We prepared our production templates so you can conveniently download them and start designing without wasting time.
Lastly, you will need an idea of what you want to create. This part is actually the most important. So before you start designing, collect some images of what you like.
When looking for inspiration, don’t look only for fight wear. We recommend that you don’t look at other fight wear as this will only inspire you to do something already made before.
Think of your team and the vibe you have in the gym while training. The inspiration can come from the team name, the location of the gym, or the type of music you all like to listen to while simulating murder.
Is your sound system blasting an 80′ love song playlist during every class? There you go, that’s a particular visual style!
Make a mood board, sketch it out and ask your teammates for feedback. We strongly recommend choosing one person who will have the final word when designing fight wear for your team.
Everyone has an opinion, but opinions are not worth anything. You will make your life easier if you agree beforehand who is the decision maker. You can ask for feedback as much as you like, but that doesn’t mean you should listen to everyone.
Basic Terms
Before we start designing, let’s clarify some standard terms we will use in this guide so we don’t have to stop and explain later. Don’t worry. We are keeping the glossary short.
- Raster Graphic: A raster graphic is an image composed of pixels arranged in a grid. It is resolution-dependent, meaning resizing it might result in a loss of image quality.
- Vector Graphic: A vector graphic is an image created using mathematical equations to define shapes and lines. It is resolution-independent and can be scaled without losing quality.
- Seam: A seam refers to the line where two pieces of fabric are joined or sewn together.
- Safe Printing Zone: The safe printing zone is an area within the design layout where important elements or text should be placed to ensure they are not cut off during the printing or manufacturing process.
- DPI: DPI stands for “dots per inch.” It is a measurement of printing resolution, indicating how many individual dots can be placed in a linear inch. Higher DPI values generally result in higher image quality.
- Sublimation Print: Sublimation printing is a process where ink is transferred onto fabric through a heat press. The ink turns into a gas and permeates the fabric, resulting in vibrant and durable prints.
- Screen Printing: A printing method where ink is pressed through a mesh screen onto fabric, creating designs with multiple colours using separate screens for each colour layer.
- Embroidery: Embroidery involves decorating fabric with designs, patterns, or logos by stitching threads onto the fabric using a needle and thread or embroidery machine.
- Patch: A patch is a small piece of fabric with an embroidered or printed design that can be sewn or attached to garments for decorative or branding purposes.
Now that you know the basic terms, let’s get down and make something pretty.
Tools And Templates
There are free and paid and free options for graphic editors that you can use to design your fight wear. Let’s look at the main differences so you can get started.
Choose the right tool.
We already mentioned that Adobe makes the industry standard for graphic editors. You can download their apps individually and pay per month as you go. If you are a student or teacher, you can get the subscription for a special price. You only need an email address with your name and the university or school name after the @ sign.
If you only can afford one app, download Adobe Illustrator. This vector-based graphic editor will allow you to do everything you need for this project and way more. If you can, ad Adobe Photoshop, a raster-based graphic editor. But you might not need Photoshop at all.
If you don’t want to pay for Adobe apps, you can get a trial version that expires after 30 days, which is more than enough time to design what you need.
Alternatively, there are free apps that you can try. From the most popular ones, look at Gimp, Inkscape or Vectornator. There are plenty more. The free licence means the product is not as great as the premium alternatives, but it will get the job done.
Keep in mind that there are certain limitations to what is technically possible. There are three ways to customise your fight wear which help us divide the gear into three groups based on the possible technique.
- Sublimation Print: Rashguards, Fight shorts, Compression Shorts, Spats, and Inlay of Gi
- Embroidery: BJJ Belts, Polo Shirts, and outside of Gi
- Screen Printing: Hoodies and T-shirts
Although some exceptions are possible, these are the technical limitations you have to work with. To explain a bit more…
Sublimation print is a method that allows you to print even a photograph on a rashguard, for example. If your photograph or raster graphic has sufficient resolution, there’s no problem in printing it. The issues start when you are trying to print a tiny compressed JPG. That is just not a good idea, and it will result in pixelated or blurry print.
We recommend using vector graphics (and vector editors like Adobe Illustrator) as much as possible for the best results.
Embroidery and Screen printing are techniques where we only work with 2 to 3 colours, so it’s impossible to print a photo-realistic graphic. Embroidery is perfect for logos, text, or simple and single-colour graphics.
How do you know if you need Illustrator or Photoshop?
It comes down to your design idea and the gear you want to produce.
If you want a highly detailed, photo-realistic design, use Photoshop. Remember that this is only possible to print with products that use sublimation.
If your design consists of logo, text, shapes, solid colours, or possibly gradients, you will be OK with just Illustrator.
Let’s say that you do decide to make a rashguard with an all-over print on the face of your coach from that night we he had just a little bit too much to drink. We are not here to stop great ideas, so let’s make sure that the print is crisp and sharp.
Make sure that the photo is not compressed. Smartphones make pretty good quality pictures, but as soon as you work with a picture that was sent through WhatsApp, it will be compressed down to potato quality.
In an ideal world, your picture would be 300 DPI and over 2500x2500px (for an image that should cover back, for example). This is one of the rare situations when the rule “the more, the better” is very true. We can always scale down a picture that is too big, but it’s hard to scale it up without losing quality.
Download the templates
All right, you have an idea of what you want to design and a computer with a suitable graphic editor in front of you. Now it’s time to get your templates.
Follow the link below and download the templates for the product you are looking to produce.
[Link the Google Drive with templates here]
Open the downloaded template in your graphic editor, and let’s move on to the next step!
How to design your gear
This guide will show examples of designing your fight wear in Illustrator. We can’t possibly create a guide for every possible app, but the steps are the same. Just the user interface will look different.
Ideally, you would finalise the design before you start creating the template. That way, there are no roadblocks on your way, and you are here just to move your ready design to the product templates.
If you are starting just with a rough idea of what you want, it’s no problem. Open the .ai file of a product you want to design. In this example, we will design a short sleeve rashguard.
Stay Safe
…or keep your design safe. Once you open the template, you will see the outlines of all pieces of fabric laid out in front of you on one artboard.
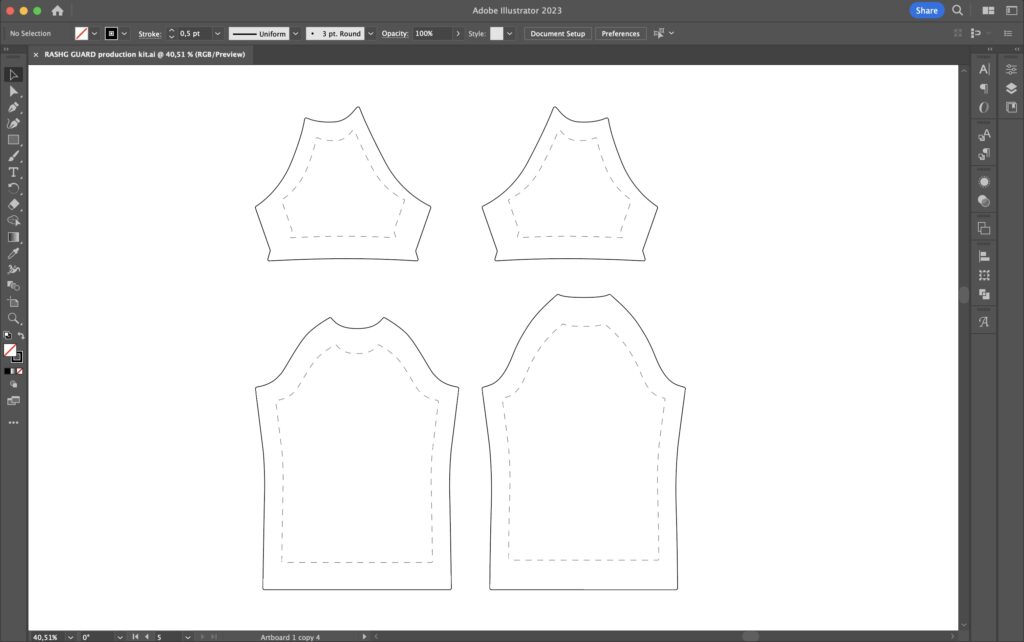
The Safe Printing Area start a few centimetres inside of the outline. Various sizes will more or less eat in towards the centre. For example, an XXL rashguard will have almost everything visible, with just a tiny part hidden by the seams. An XS (extra small) rashguard, on the other hand, will have seams way closer to the centre.
It’s essential to remember the Safe Printing Area, especially if you have design elements going over the seams. In other words, placing something too close to the seams might not be visible.
It’s ok to have a design from seam to seam. Just keep in mind how it works. In one edition of the Choke&Chill rashguard, we have a horizontal stripe wrapping around the whole body. This was achieved by placing the stripe in the front and back pieces at the same height.
This way, the stripe seems connected at the seams on the side.
If you are not sure whether your design is safe to print, you can always ask for one of our designers, and they will give you quick feedback.
Principles
This is a brief overview of principles to keep in mind when designing:
Colour space: The templates are set up in CMYK. Please do not change this setting.
Patterns: Patterns look great, and using them in your design is fine. Just remember that making your patterns seamlessly connect in seams is very hard, near impossible.
Mixing vector and raster graphics: Go ahead if you know what you are doing. If you don’t, we recommend not mixing raster and vector graphics. An example would be: Placing a jpeg, png, or gif in your illustrator file.
Converting raster to vector: There are apps and different ways to automatically convert a jpg, png, or any other raster graphic into a vector type. Be very cautious and pay attention to the results you are getting because you will lose some detail. The only 100% safe way to do this is to trace the image manually – which takes time.
Design responsibly: We rely on you to be mindful of the contents of your design. We grant ourselves permission not to do business with anyone who creates gear promoting hate, excessive violence or abuse.
This requirement is hard to describe because we are in the space of martial arts, so we rely on our customers to be responsible. Jokes, puns, and anything done in good faith is ok.
Copyright: Only use graphics you created, bought or have a licence for. We take no responsibility in case you use any copyrighted materials.
Exporting
Before you wrap up the design work, zoom out and look at all the parts of your gear.
- Does it look good?
- Are the design elements placed as you intended?
- Is the orientation correct? (front in the front, back on the back, etc.)
- Did you check for typos?
If your answer to the above is yes, then you are ready to export your templates. First, expand all text layers into shapes. In Illustrator, you can select the text layer > Object > Expand. Export a print-ready PDF by File > Save as > Format: Adobe PDF.
Make sure that the file(s) is correctly named and you are ready to send your order.
Sending It
The last step is to fill in the order request form at custom-fightwear.com.
- Fill in your details.
- Select your products.
- Add how many pieces you are looking to produce.
- Choose the Do It Yourself option.
- Upload your designed production files.
If you upload more than one file, it’s better to compress them all into one .zip file.
We review all orders manually. As soon as we review your order, you will receive a confirmation email with payment details. After we process your payment, production can begin.
Congratulations, you’ve just designed your own fight wear!
If you feel like there’s nothing stopping you now, you are doing something right.
